With Umbraco 7 comes a new way to create property editors. AngularJS seems to be the way forward, and I have to admit I’m still very new to it and desperately trying to get my head around it.
We needed the ability to be able to select a view from the MacroPartials folder when building this site, so it was an excuse to play with and create a property editor and to create a blog on it – We called it ‘Partial Picker’ and here is how we made it.
Folder / File Structure
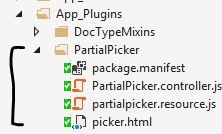
First thing to do is to create the folder and file structure. Below is a screen shot of all the files and folders. So in your App_Plugins folder create a folder called PartialPicker and add the same files as show, with the same names.
Now you’ve done that, I’ll run through each file and show you the code to add to it.
package.manifest
The manifest is where you tell Umbraco about the name and settings of your property editor, and also any other JavaScript files to include. Copy and paste the code below into your manifest file.
{
propertyEditors: [
{
alias: "Apt.PartialPicker",
name: "Partial Picker",
editor: {
view: "~/App_Plugins/PartialPicker/picker.html"
},
prevalues: {
fields: [
{
label: "Folder to show",
description: "Enter the folder path of where the partials are you want to pick",
key: "folderpath",
view: "requiredfield",
validation: [
{
type: "Required"
}
]
}
]
}
}
]
,
javascript: [
'~/App_Plugins/PartialPicker/PartialPicker.controller.js',
'~/App_Plugins/PartialPicker/partialpicker.resource.js'
]
}
PartialPicker.controller.js
The controller is what deals with the main logic, saving and setting values, getting data from services/resources/repos etc…
angular.module("umbraco")
.controller("PartialPicker.controller",
function ($scope, $log, partialpickerResource) {
partialpickerResource.getAll($scope.model.config.folderpath).then(function (response) {
$scope.partials = response.data;
});
$scope.saveSelectedFile = function () {
$scope.model.value = $scope.partialFile;
};
});
partialpicker.resource.js
This file is our resources file which has our factory in, I kind of look at it like a datarepository where we call out to get data from external files/API’s. In ours, it has a single Ajax get call to an API controller action which we’ll create in a moment.
//adds the resource to umbraco.resources module:
angular.module('umbraco.resources').factory('partialpickerResource',
function ($q, $http) {
//the factory object returned
return {
//this cals the Api Controller we setup earlier
getAll: function (folder) {
return $http.get("backoffice/Apt/PartialPickerApi/GetFiles", {
params: { folder: folder }
});
}
};
}
);
picker.html
This is the UI that appears on the DataType and what the user interacts with to select data and gets saved in the Umbraco Db/Cache.
<div ng-controller="PartialPicker.controller">


<select ng-model="partialFile" ng-change="saveSelectedFile()">
<option value="">-- Choose --</option>
<option ng-repeat="partial in partials" value="{{partial.File}}" ng-selected="partial.File == model.value">{{partial.File}}</option>
</select>


</div>
Api Controller
I mentioned in the factory/resource file we call out to an API controller. This is a really simple Controller that just needs a couple of attributes (See below) and to implement a class called UmbracoAuthorizedJsonController. It literally just gets all razor .cshtml files from the specified folder in the editor settings which we’ll cover in a moment.
[PluginController("Apt")]
[IsBackOffice]
public class PartialPickerApiController : UmbracoAuthorizedJsonController
{
public IEnumerable<PartialPicker> GetFiles(string folder)
{
var list = new List<PartialPicker>();
if (!string.IsNullOrEmpty(folder))
{
var files = Directory.GetFiles(HostingEnvironment.MapPath(folder), "*.cshtml").Select(Path.GetFileName).ToArray();
list.AddRange(files.Select(file => new PartialPicker {File = file}));
}
return list;
}
}
Working In Umbraco
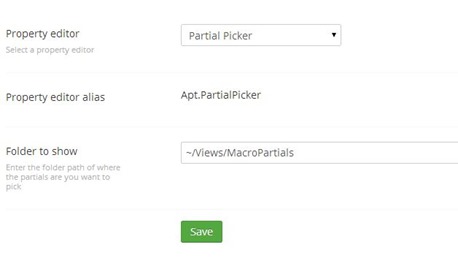
Now you have all this in place, run Umbraco and go to Developer > Data Types and create a new DataType. You should now see the PartialPicker and when you select it you will get the options which were outlined in the manifest.
Set the folder where you want the editor to look. For us, and I would guess most people would use the macro partials folder
~/Views/MacroPartials
Save the property editor, and then go to your DocType and add the DataType to your DocType – In our site we called it View Macro. Now browse to the content section and open up a page that is using the DocType you added it to. You should now see the following
You can now select any view in the folder, and the file name is stored in the cache which you can then pull out using your normal Model.Content.GetPropertyValue<string>(“viewMacro”) call in your razor or repositories.
Cache
In this version of Umbraco 7 there are some cache issues, if you can’t see the partial picker then you’ll probably need to clear your cache and recycle your app pool. You can also increment the ClientDependency version in the ClientDependency.config too.


